Git support Parallel Development. Parallel Development means you can create branch.
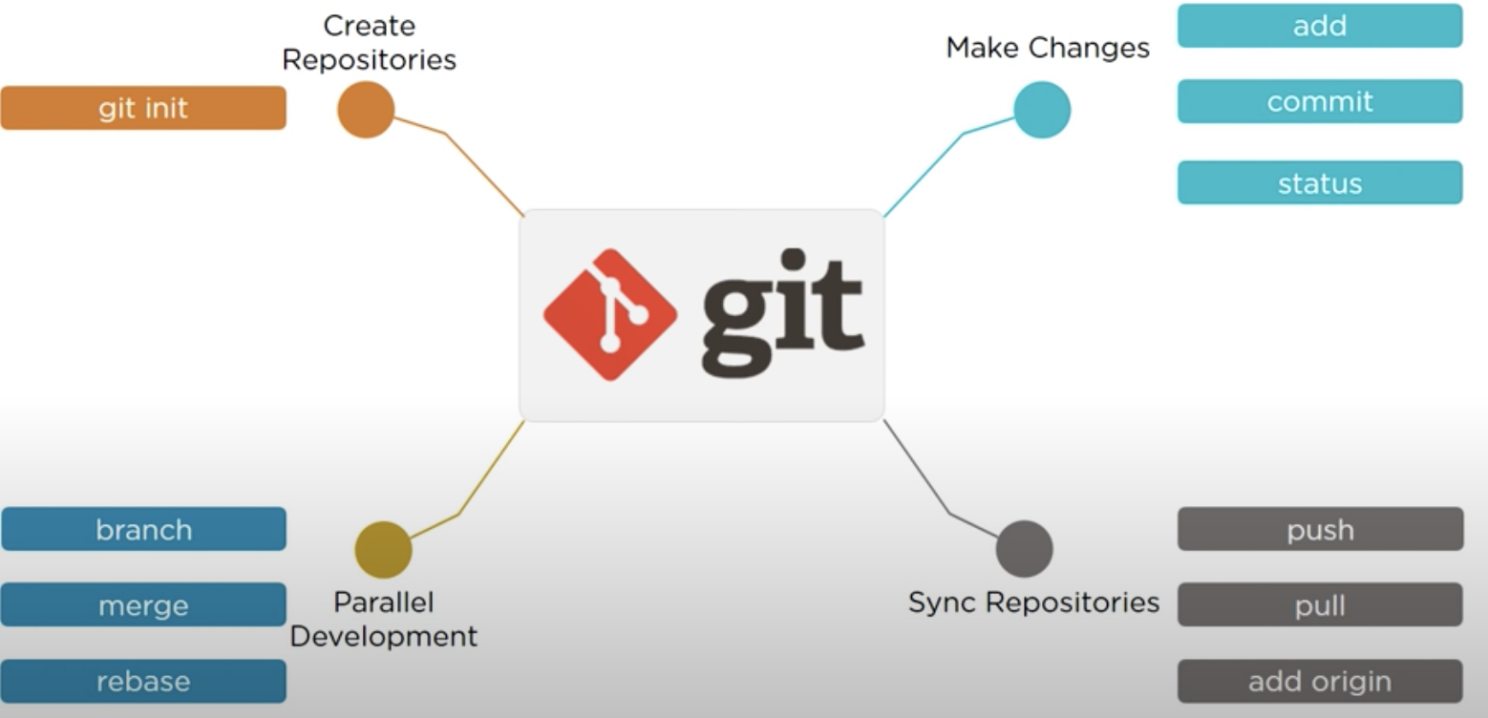
Basic git Operations
- connect your local repository to your remote repository:
git remote add origin https://github.com/benwzj/animationsApp.git - push the file to remote repository:
git push origin master - create a branch named my_branch:
git branch my_branch - checkout my_branch, then you switch to my_branch. What you add, commit will be in my_branch:
git checkout my_branch - add file to my_branch, this command just add file to staging area:
git add file1.txt - add all untracked files to my_branch:
git add -A - adds all modified and new (untracked) files in the current directory and all subdirectories to the staging area (a.k.a. the index), thus preparing them to be included in the next git commit .
git add . - remove a file form staging area:
git reset file1.txt -
remove all staging file:
git reset - commit file to repository:
git commit -m “some information” - merge my_branch to master:
git checkout mastergit merge my_branch - Now, you have two branch in you local repository: master and my_branch. If you want to push them to remote repository, then:
git push origin masterorgit push origin my_branch - check log what you have done:
git logEvery push have a hash key, Unique hash key. - if you company have already a remote repo, you can clone that by:
git clone <url> <where to clone> - show remote repo information:
git remote -v - before you push you repo to remote, should pull remote repo to local first:
git pull origin masterthengit push origin master - list all branch in repository:
git branch - list all branch including remote repository:
git branch -a - create my_branch:
git branch my_branch - check out branch, means you are on my_branch now:
git checkout my_branch - check which branch merge:
git branch --merged - delete branch my_branch:
git branch -d my_branch - delete remote branch:
git push origin --delete my_branch
Programer daily routine:
git branch day_branch
git checkout day_branch
// Do coding …
git status
git add -A
git commit -m “one day work…”
git push -u origin day_branch
git checkout master
git pull origin master
git merge day_branch
git push origin master
Setting up a repo
Steps for Pushing an existing unversioned project to a Git repository.
- Inside project root folder, run
git initcreates a .git environment. It will create .git folder and .gitignore file. - create repository in Git server, e.g. Github.
- connect the project to Git server Repository.
git remote add origin git@github.com:benwzj/CodeDeployBlog.git - then you can work on it
git branch -M main
git add .
git commit -m'initial
git push -u origin main
Basic Command for Repository
Command git init
The git init command creates a new Git repository. It can be used to convert an existing, unversioned project to a Git repository or initialize a new, empty repository. Executing git init creates a .git subdirectory in the current working directory, which contains all of the necessary Git metadata for the new repository.
git init --bare, Bare repositories is for Central repositories that doesn’t have a working directory git init template, Templates allow you to initialize a new repository with a predefined .git subdirectory.
Command git clone
git clone is used to target an existing repository and create a clone, or copy of the target repository. Internally, git clone first calls git init to create a new repository. It then copies the data from the existing repository, and checks out a new set of working files.
Just do this:
git clone git@github.com:benwzj/CodeDeployBlog.gitEverything is done.
Command git config
Executing git config will modify a configuration text file values on a global or local project level. The most basic use case for git config is to invoke it with a configuration name, which will display the set value at that name. Configuration names are dot delimited strings composed of a ‘section’ and a ‘key’ based on their hierarchy. Example:
git config --global credential.UseHttpPath true-
git config --local, By default, git config use local level:.git/config -
git config --global, global flag:~ /.gitconfig -
git config --system,$(prefix)/etc/gitconfig -
git config --listlist the content of the configuration file. for global file:git config --list --global -
git config --global --editedit the config file. Content of configuration file-- credential -- user -- editor - core.editor -- Merge tools -- Colored outputs -- Formatting & whitespace - Aliases:
git config --global alias.ci commitGit aliases allow you to create shortcuts for frequently used Git operations. The term alias is synonymous with a shortcut. Aliases are used to create shorter commands that map to longer commands. no direct git alias, but you can:git config --global alias.co checkout
Command git remote set-url
Changes an existing remote repository URL.
Command git remote rename
Rename an existing remote.
Command git remote rm
Remove a remote URL from your repository.
Saving changes
git add git commit git diff git stash .gitignore
Command Git add
The git add command adds a change in the working directory to the staging area. And this ‘stage’ changes will be stored in a commit. However, git add doesn’t really affect the repository in any significant way—changes are not actually recorded until you run git commit.
What is Staging area The staging area is considered one of the “three trees” of Git, along with, the working directory, and the commit history. The stage lets you group related changes into highly focused snapshots before actually committing it to the project history
-
git add -p, Begin an interactive staging session that lets you choose portions of a file to add to the next commit.
Command Git commit
The git commit command captures a snapshot of the project’s currently staged changes. How it work
- At a high-level, Git can be thought of as a timeline management utility.
- git commit is used to create a snapshot of the staged changes along a timeline of a Git projects history.
- Commits can be thought of as snapshots along the timeline of a Git project.
- Commits are created with the git commit command to capture the state of a project at that point in time.
- Git’s version control model is based on snapshots.
- Git records the entire contents of each file in every commit.
Command Git diff
Diffing is a function that takes two input data sets and outputs the changes between them. git diff is a multi-use Git command that when executed runs a diff function on Git data sources, like commits, branches, files. The git diff command is often used along with git status and git log to analyze the current state of a Git repo.
Show any uncommitted changes since the last commit, across the entire repository:
Use git diff.
Comparing files, showing the changes that are not staged yet:
git diff ./path/to/file equal to: git diff HEAD ./path/to/file. It will compare file in the working directory, against the index, showing the changes that are not staged yet.
Compare the staged changes with the local repository:
Use git diff --cached ./path/to/file. (The --cached option is synonymous with --staged.)
Comparing files between two different commits:
You can pass Git refs (like HEAD, tags, and branch names) to git diff to commits to diff. Every commit in Git has a commit ID which you can get when you execute GIT LOG. You can also pass this commit ID to git diff. For example: git diff 957fbc92b123030c389bf8b4b874522bdf2db72c ce489262a1ee34340440e55a0b99ea6918e19e7a.
Comparing branches:
git diff branch1..branch2
Comparing a file from two branches:
git diff main new_branch ./path/to/file
Comparing a file from two commits????
????
Command git stash
git stash temporarily stashes changes you’ve made to your working copy so you can work on something else, and then come back and re-apply them later on. You can reapply previously stashed changes with git stash pop. Popping your stash removes the changes from your stash and reapplies them to your working copy.
.gitignore file
Git sees every file in your working copy as one of three things:
- tracked - a file which has been previously staged or committed;
- untracked - a file which has not been staged or committed; or
- ignored - a file which Git has been explicitly told to ignore.
Undoing Changes
git checkout git clean git revert git reset git rm
Reviewing old commit
- We use
git logto get a list of the latest commits.git log --branches=*get the commits for specific branch.git log --onelinecan be a easier way. - When you have found a commit reference to the point in history you want to visit, you can utilize the
git checkoutcommand to visit that commit. -
Git checkoutis an easy way to “load” any of these saved snapshots onto your development machine.
Undo commit with git checkout
Detached HEAD state
- When you check out a previous commit, for example:
git checkout a1e8fb5. And then HEAD no longer points to a branch—it points directly to a commit. This is called a “detached HEAD” state. - In a detached state, any new commits you make will be orphaned when you change branches back to an established branch. So don’t commit in Detached HEAD state!
- To prevent orphaned commits from being garbage collected, we need to ensure we are on a branch: From the detached HEAD state, we can execute git checkout -b new_branch. This will create a new branch named new_branch and switch to that state.
- At this point, we can continue work on this new branch in which the
872fa7ecommit no longer exists and consider it ‘undone’. -
Sometime, this is not a appropriate way, for example for public shared repositories. But You can use git revert
- NOTE: Checking out an old file does not move the HEAD pointer. It remains on the same branch and same commit, avoiding a ‘detached head’ state. You can then commit the old version of the file in a new snapshot as you would any other changes. So, in effect, this usage of git checkout on a file, serves as a way to revert back to an old version of an individual file.
Undo a commit with git revert
-
git revertis used to record some new commits to reverse the effect of some earlier commits (often only a faulty one). If you want to throw away all uncommitted changes in your working directory, you should see git-reset. -
git revertfigures out how to invert the changes introduced by the commit and appends a new commit with the resulting inverse content. - Reverting should be used when you want to apply the inverse of a commit from your project history.
- if you’re tracking down a bug and find that it was introduced by a single commit. Instead of manually going in, fixing it, and committing a new snapshot, you can use
git revertto automatically do all of this for you. - It’s important to understand that
git revertundoes a single commit—it does not “revert” back to the previous state of a project by removing all subsequent commits. git reset do that! -
git revertprevents Git from losing history. -
git revertis the ideal ‘undo’ method for working with public shared repositories.
Using git revert:
-
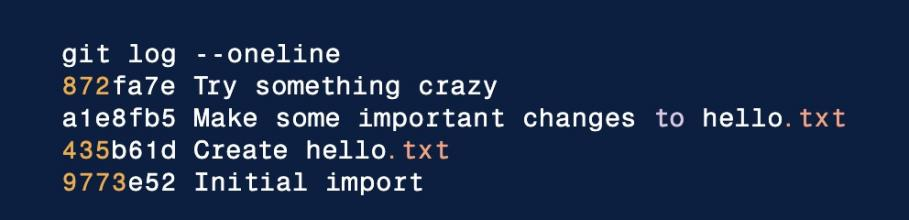
git revertexpects a commit ref was passed in. - If we pass HEAD in:
git revertHEAD, Git will create a new commit with the inverse of the latest commit. - This adds a new commit to the current branch history and now makes it look like:
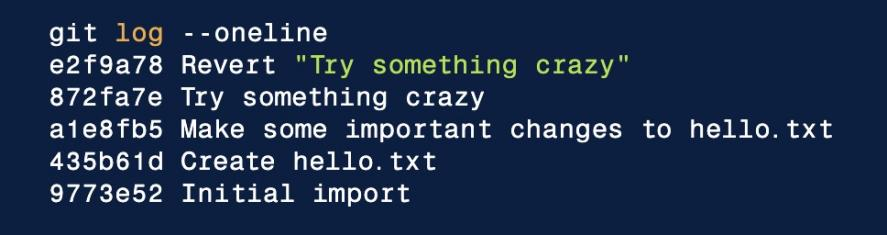
- At this point, we have again technically ‘undone’ the 872fa7e commit.
Undo a commit with git reset
-
git reset- Reset current HEAD to the specified state. -
git resetis a complex and versatile tool for undoing changes. - It has three primary forms of invocation. These forms correspond to command line arguments –soft, –mixed, –hard.
- The three arguments each correspond to Git’s three internal state management mechanism’s, The Commit Tree (HEAD), The Staging Index, and The Working Directory.
Using git reset:
- If we invoke
git reset --hard a1e8fb5for this example, the commit history is reset to that specified commit.

- The log output shows the e2f9a78 and 872fa7e commits no longer exist in the commit history.
- This method of undoing changes has the cleanest effect on history, comparing
git revert. - But git revert method is not good for shared remote repository.
git resetshould generally be considered a ‘local’ undo method.
Undoing the last commit
git commit --amend. This will have Git open the configured system editor and let you modify the last commit message. The new changes will be added to the amended commit.
Command Git clean
-
git cleanis a convenience method for deleting untracked files in a repo’s working directory. -
git cleanwill make a hard filesystem deletion. Make sure you really want to delete the untracked files before you run it. -
git cleanis to some extent an ‘undo’ command.git cleancan be considered complementary to other commands like git resetandgit checkoutto fully undo any additions and commits in a repository.
Options:
-
git clean -nwill perform a “dry run”. -
git clean -fThe force option initiates the actual deletion of untracked files from the current directory.
Undo Changes Conclusion
- get information:
git status, git log - undo local unstaged changes:
git restore filename - undo local staged changes:
git restore --staged filename - undo latest local commit, and still keep the changes:
git reset --soft HEAD~ - undo public committed changes. Following command will undo the changes by creating a new commit and reverting that file to its previous state, as if it never changed:
git revert cc3bbf7 --no-edit
Collaborating whit Git
Git is designed to give each developer an entirely isolated development environment. This means that information is not automatically passed back and forth between repositories. Instead, developers need to manually pull upstream commits into their local repository or manually push their local commits back up to the central repository. Git is different from SVN which uses a single centralized repository to serve as the communication hub for developers.
git remote,
git fetch,
git push,
git pull
Command git remote
The git remote command is essentially an interface for managing a list of remote entries that are stored in the repository’s ./.git/config file. That means the git remote command lets you create, view, and delete connections to other repositories.
What is Remote connections
- Remote connections are more like bookmarks rather than direct links to other repositories.
- Remote connections are stored in the repository’s
./.git/configfile. - Once using git clone, a record have been created in
./.git/config - These connections can be central repo or another developer’s repo.
Fetching and pulling from Git remotes
Once a remote record has been configured through the use of the git remote command, the remote name can be passed as an argument to other Git commands to communicate with the remote repo. Both git fetch, and git pull can be used to read from a remote repository. The git remote command is really just an easier way to pass URLs to these “sharing” commands.
Command git fetch
git fetch is a primary command used to download contents from a remote repository. And then you can update a local repository to the state of a remote. Git isolates fetched content from existing local content; it has absolutely no effect on your local development work. This makes fetching a safe way to review commits before integrating them with your local repository. Fetched content has to be explicitly checked out using the git checkout command.
You need to use git checkout to checkout what you have fetched, And then git merge it to your Repo.
Command git pull
The git pull command is used to fetch content from a remote repository and immediately update the local repository to match that content.
pull process detail:
- In the first stage of operation
git pullwill execute a git fetch scoped to the local branch that HEAD is pointed at. - Once the content is downloaded,
git pullwill enter a merge workflow. A new merge commit will be created and HEAD updated to point at the new commit.
Scenario
Assume we have a repository with a main branch and a remote origin:
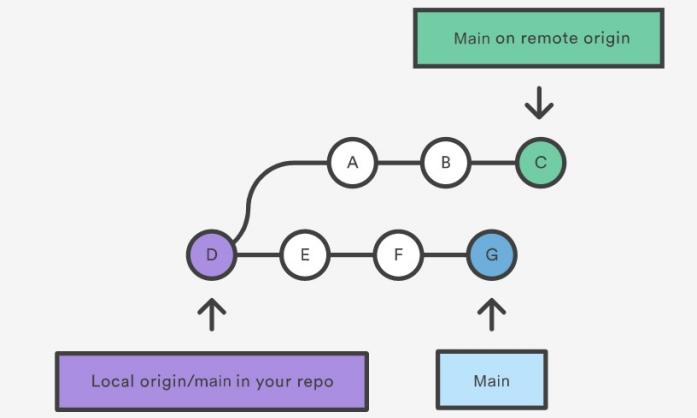
In this scenario, there are 2 merging strategies:
First one: git pull
git pull will download all the changes from the point where the local and main diverged. In this example, that point is E. git pull will fetch the diverged remote commits which are A-B-C. The pull process will then create a new local merge commit containing the content of the new diverged remote commits.
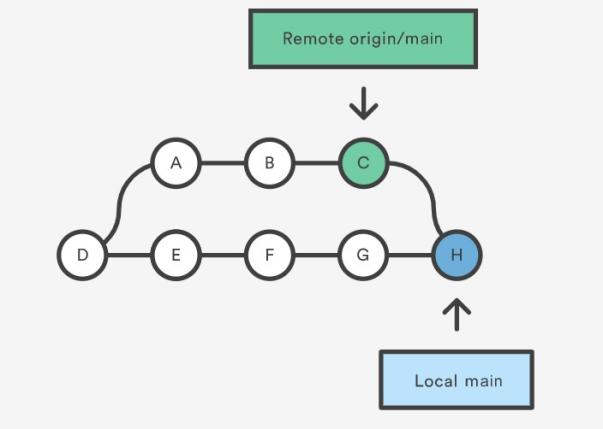
New commit H is a new merge commit that contains the contents of remote A-B-C commits and has a combined log message.
Second one: git pull --rebase
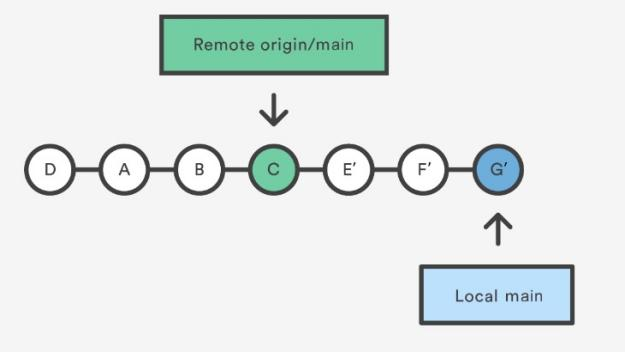
- A rebase pull does not create the new
Hcommit. Instead, the rebase has copied the remote commitsA--B--Cand rewritten the local commitsE--F--Gto appear after them in the local origin/main commit history. - Means
git pull -rebase==git fetch + git rebase(instead ofgit merge)
The --rebase option can be used to ensure a linear history by preventing unnecessary merge commits. It’s like saying, “I want to put my changes on top of what everybody else has done.”. --rebase is so common, that have a command like this: git config --global branch.autosetuprebase always
git pull vs. git fetch
Both git pull and git fetch can download content from a remote repo.
- git fetch is safer, pull == fetch + merge.
- git pull is aggressive, it will download the remote content for the active local branch and immediately execute git merge to create a merge commit for the new remote content.
Command git push
The git push command is used to upload local repository content to a remote repository. Pushing is how you transfer commits from your local repository to a remote repo. git push is essentially the same as running git merge main from inside the remote repository. Do not use the --force flag unless you’re absolutely sure you know what you’re doing. It will force the push even if it results in a non-fast-forward merge.
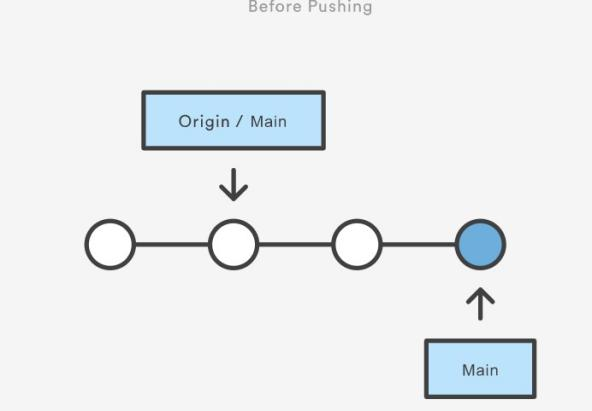
Standard methods for publishing local contributions to the central repository.
- First,
git fetch! it makes sure your local main is up-to-date by fetching the central repository’s copy and rebasing your changes on top of them. - The interactive rebase is also a good opportunity to clean up your commits before sharing them.
- Then, the
git pushcommand sends all of the commits on your local main to the central repository.
Step:
git checkout main
git fetch origin main
git rebase -i origin/main
# Squash commits, fix up commit messages etc.
git push origin main
Pull Request
What is Pull Request
- A Pull Request is the primary way you and other repository users can review, comment on, and merge code changes from one branch to another.
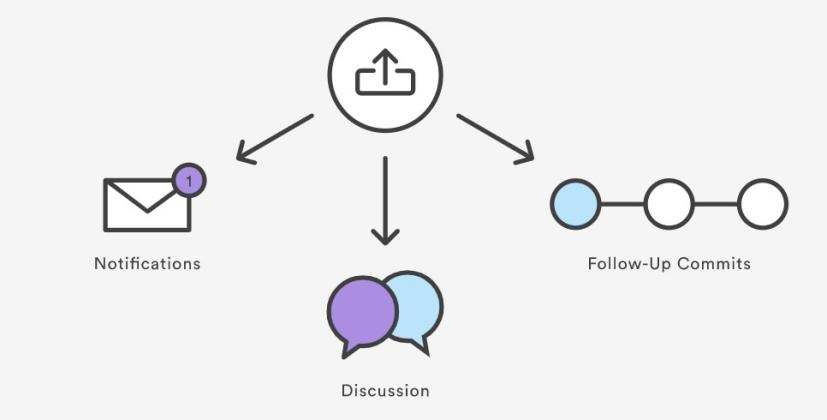
- Pull Requests are a mechanism for a developer to notify team members that they have completed a feature. Once their feature branch is ready, the developer files a Pull Request. This lets everybody involved know that they need to review the code and merge it into the main branch.
- The Pull Request is more than just a notification—it’s a dedicated forum for discussing the proposed feature. If there are any problems with the changes, teammates can post feedback in the Pull Request and even tweak the feature by pushing follow-up commits. All of this activity is tracked directly inside of the Pull Request.
- When you file a Pull Request, all you’re doing is requesting that another developer (e.g., the project maintainer) pulls a branch from your repository into their repository.
Using Branch
Git branches are an integral part of your everyday workflow. Unlike SVN branches which are expensive and only used to capture the occasional large-scale development effort.
- A branch represents an independent line of development.
- Branches serve as an abstraction for the edit/stage/commit process.
- You can think of them as a way to request a brand new working directory, staging area, and project history. New commits are recorded in the history for the current branch, which results in a fork in the history of the project.
- Remember, branches are just names for commits?? NO! Branches are references.
Common operation
- list all branch in repository:
git branch - list all branch including remote repository:
git branch -a - create my_branch:
git branch my_branch - check out branch, means you are on my_branch now:
git checkout my_branch - check which branch merge:
git branch --merged - delete branch my_branch:
git branch -d my_branch - delete remote branch:
git push origin --delete my_branch
Command git branch
The git branch command lets you create, list, rename, and delete branches.
git branch doesn’t let you switch between branches or put a forked history back together again. For this reason, git branch is tightly integrated with the git checkout and git merge commands.
Command git checkout
- The
git checkoutcommand lets you navigate between the branches created by git branch. - The
git checkoutcommand operates upon three distinct entities: files, commits, and branches. - Checking out a branch updates the files in the working directory to match the version stored in that branch, and it tells Git to record all following new commits on that branch.
- Think of
git checkoutas a way to select which line of development you’re working on.
Command git merge
- The
git mergecommand lets you take the independent lines of development created by git branch and integrate them into a single branch. - Merge involve some strategy and algorithms and it is main part when operate git.
- Git can automatically merge commits if no any conflict
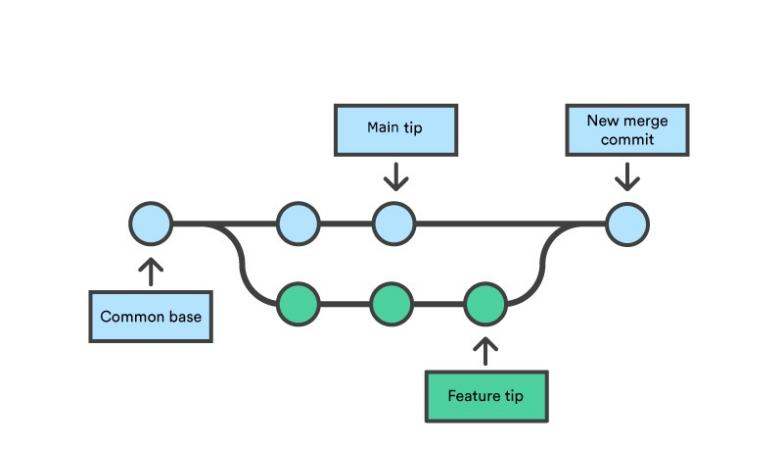
Default process: create a new “merge commit”:
-
git mergetakes two commit pointers, usually the branch tips, and will find a common base commit between them. And then it create a new “merge commit” that combines the changes of each queued merge commit sequence.
Fast Forward Merge
- If no conflict, then it is Fast Forward Merge.
- Moving the current branch tip up to the target branch tip. This effectively combines the histories, since all of the commits reachable from the target branch are now available through the current one.
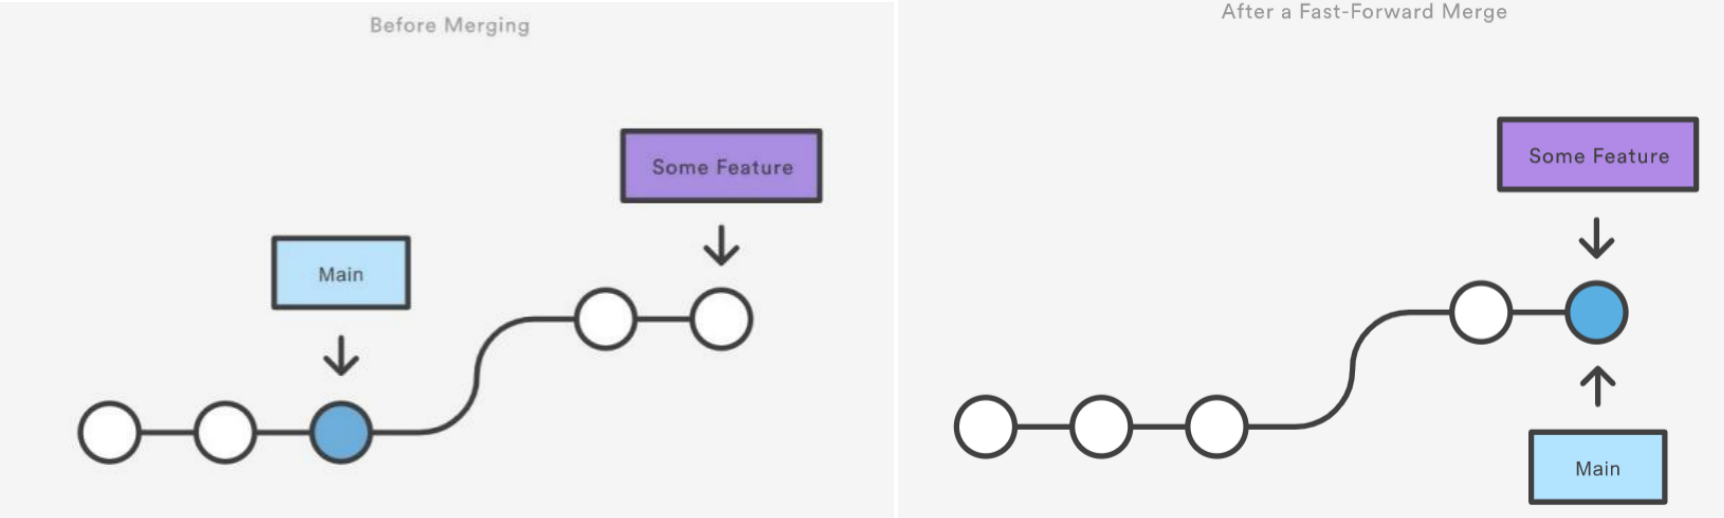
- Process looks like below:
git checkout -b new-feature main git add <file> git commit -m "featuring" # Merge in the new-feature branch git checkout main git merge new-feature git branch -d new-feature - However, a fast-forward merge is not possible if the branches have diverged.
3-way merge
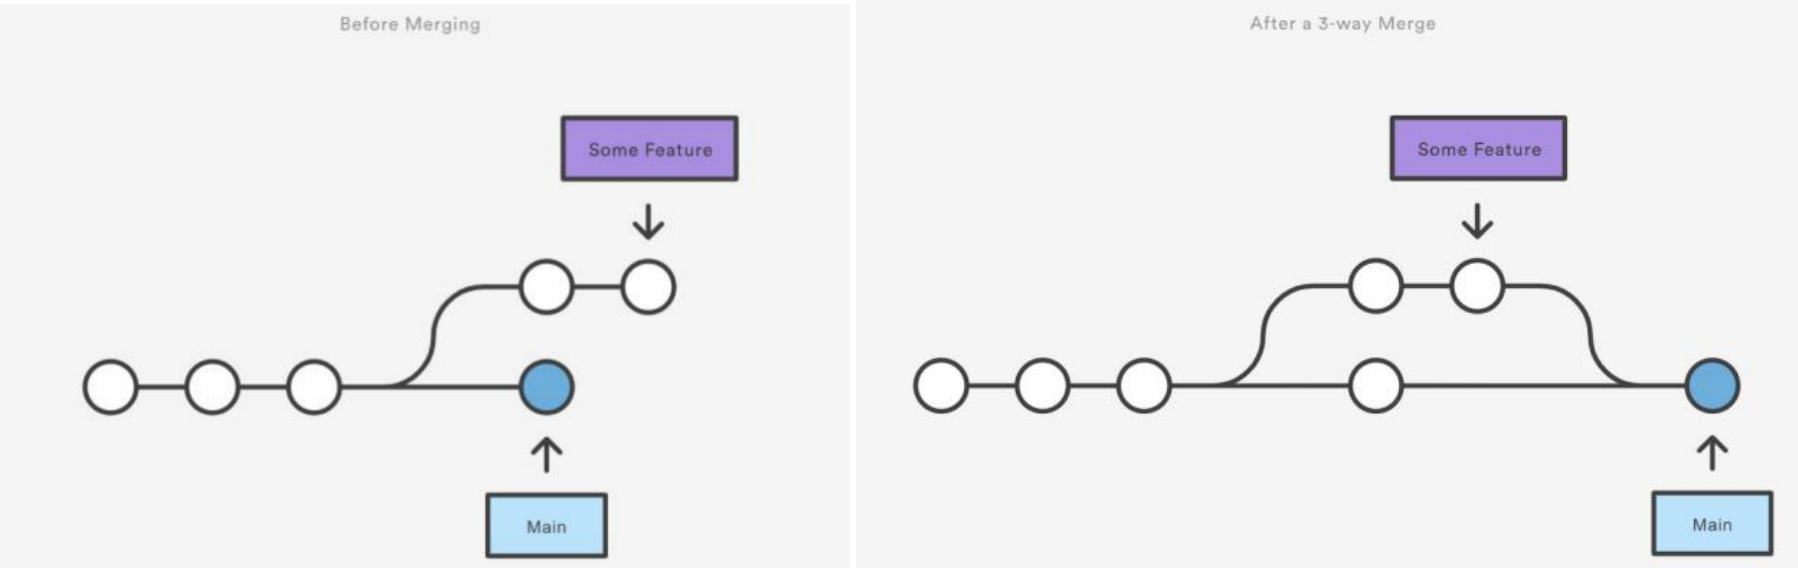
3-Way merge Process:
git checkout -b new-feature main
git add <file>
git commit -m "Start a feature"
# Develop the main branch
git checkout main
git add <file>
git commit -m "Make some super-stable changes to main"
# Merge in the new-feature branch. But it might conflict.
git merge new-feature
git branch -d new-feature
Git can automatically merge commits if no any conflict. If conflict, then go to ‘Git merge conflicts’ section below.
Command git rebase
- Rebase is one of two Git utilities that specializes in integrating changes from one branch onto another. Another one is
git merge. - Merge is always a forward moving change record. Alternatively, rebase has powerful history rewriting features.
- Rebase itself has 2 main modes: “manual” and “interactive” mode.
- Rebasing is the process of moving or combining a sequence of commits to a new base commit.
- Rebasing is most useful and easily visualized in the context of a feature branching workflow.
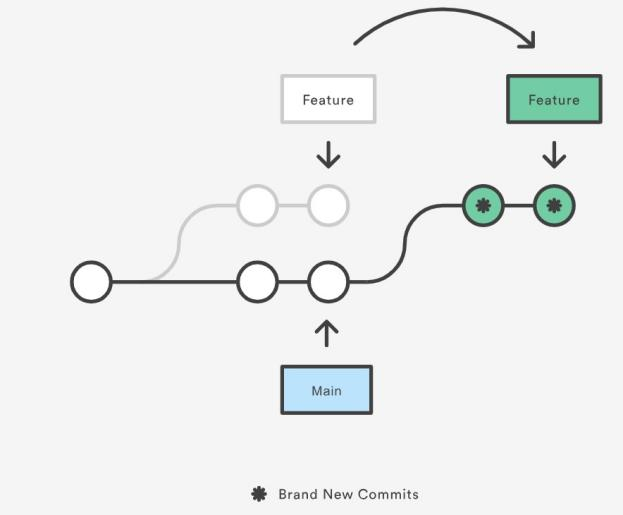
- From a content perspective, rebasing is changing the base of your branch from one commit to another making it appear as if you’d created your branch from a different commit.
- Internally, Git accomplishes this by creating new commits and applying them to the specified base.
- It’s very important to understand that even though the branch looks the same, it’s composed of entirely new commits.
- The primary reason for rebasing is to maintain a linear project history. This gives the later benefit of a clean merge of your feature branch back into the main branch.
Git merge conflicts
- If the two branches you’re trying to merge both changed the same part of the same file, Git won’t be able to figure out which version to use.
- git is using edit/stage/commit workflow to resolve merge conflicts.
- git status can guild you.
- Conflicts only affect the developer conducting the merge, the rest of the team is unaware of the conflict.
- Git will mark the file as being conflicted and halt the merging process. It is then the developers’ responsibility to resolve the conflict.
- Git provide commands to resolve the conflict. Like
git log,git reset,git status,git checkout.
Merge Strategies:
- The git merge and git pull commands can be passed an -s (strategy) option. Like:
git merge -s recursive branch1 branch2 - Strategy can be: • Recursive(default) • Resolve • Octopus • Ours • Subtree