What is Routing
Routing is the skeleton of every web application. It is refer to the structure of files and URL.

App Route vs Page Route
- Next.js doc divided into two parts: App Route and Page Route.
- In version 13, Next.js introduced App Router built on React Server Components, which supports shared layouts, nested routing, loading states, error handling, and more. New Project should use App Route.
- The App Router works in a directory named
app. The Page Route works in apagesdirectory. They can work at the same time. - App Route structure:
└── app ├── about │ └── page.tsx ├── globals.css ├── layout.tsx ├── login │ └── page.tsx ├── page.js └── team └── route.tsx - Page Route structure:
└── pages ├── about.tsx ├── index.tsx └── team.tsx - In App Route, Components is Server Components by default; In Page Route, component is Client Components by default.
- In App Route,
fetchfunction for data fetching; In Page Route, It is usinggetServerSideProps,getStaticProps,getInitialProps. - In App Route, Layouts can be nested and dynamic; In Page Route, Layouts are static.
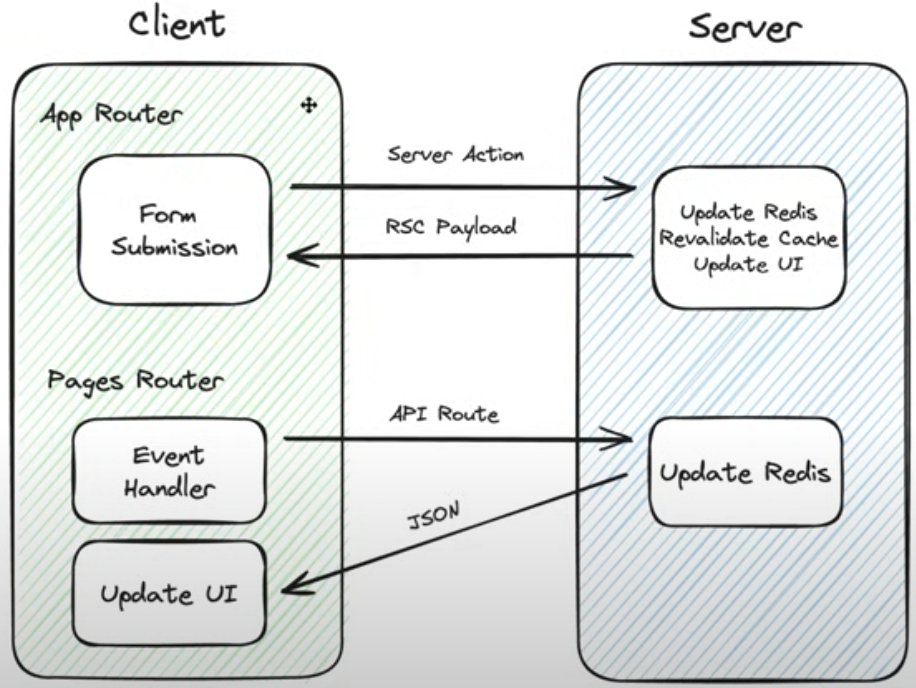
This two models are foundationally different
- In the page router model, you write code the client components, everything is in the client components. For example you have a
event_handlerthat will callAPI routewhich update some resource in server, and then that API route return some JSON to the client, and the client will handle the JSON and update the UI. - App router is totally server based! Form submit Server action, and server can update resource, revalidate cache, and return new UI data.
App Route Basic
File Conventions
Next.js provides a set of special files to create UI with specific behavior in nested routes:
-
layoutShared UI for a segment and its children -
pageUnique UI of a route and make routes publicly accessible -
loadingLoading UI for a segment and its children -
not-foundNot found UI for a segment and its children -
errorError UI for a segment and its children -
global-errorGlobal Error UI -
routeServer-side API endpoint -
templateSpecialized re-rendered Layout UI -
defaultFallback UI for Parallel Routes
Component Hierarchy
The React components defined in special files of a route segment are rendered in a specific hierarchy:
- layout.js
- template.js
- error.js (React error boundary)
- loading.js (React suspense boundary)
- not-found.js (React error boundary)
- page.js or nested layout.js
Page
- A
page.jsfile is required to make a route segment publicly accessible. - A page is UI that is unique to a route. You can define a page by default exporting a component from a
page.jsfile. - Pages are Server Components by default, but can be set to a Client Component.
- Pages can fetch data.
Layout
- A layout is UI that is shared between multiple routes. (HOW? the page at the same folder and all the subfolder pages share the layout!)
- On navigation, layouts preserve state, remain interactive, and do not re-render.
- You can define a layout by default exporting a React component from a
layout.jsfile. The component should accept achildrenprop that will be populated with a child layout (if it exists) or a page during rendering. - Root Layout (Required)
- Nesting Layouts, By default, layouts in the folder hierarchy are nested, which means they wrap child layouts via their children prop.
- Layouts are Server Components by default but can be set to a Client Component.
- Passing data between a parent layout and its children is NOT possible. However, you can fetch the same data in a route more than once, and React will automatically dedupe the requests without affecting performance.
- Layouts do not have access to the route segments below itself. To access all route segments, you can use
useSelectedLayoutSegmentoruseSelectedLayoutSegmentsin a Client Component. - You can use
Route Groupsto opt specific route segments in and out of shared layouts. - You can use
Route Groupsto create multiple root layouts.
Templates
- Templates are similar to layouts in that they wrap each child layout or page.
-
Unlike layouts that persist across routes and maintain state, templates create a new instance for each of their children on navigation. This means that when a user navigates between routes that share a template, a new instance of the component is mounted, DOM elements are recreated, state is not preserved, and effects are re-synchronized.
- Templates would be a more suitable option than layouts at below situations:
- Features that rely on useEffect (e.g logging page views) and useState (e.g a per-page feedback form).
- To change the default framework behavior. For example, Suspense Boundaries inside layouts only show the fallback the first time the Layout is loaded and not when switching pages. For templates, the fallback is shown on each navigation.
Metadata
In the app directory, you can modify the <head> HTML elements such as title and meta using the Metadata APIs.
Navigation
4 ways to navigate between routes
- Using the
<Link>Component:<Link>is a built-in component that extends the HTML<a>tag to provide prefetching and client-side navigation between routes. It is the primary and recommended way to navigate between routes in Next.js.- Linking to Dynamic Segments:
<Link href={`/blog/${post.slug}`}>{post.title}</Link> - Checking Active Links:
usePathname()to determine if a link is active.
- Linking to Dynamic Segments:
- Using the
useRouterhook (Client Components) - Using the
redirectfunction (Server Components) - Using the native History API: Next.js allows you to use the native
window.history.pushStateandwindow.history.replaceStatemethods to update the browser’s history stack without reloading the page. These APIs integrate into the Next.js Router, allowing you to sync withusePathnameanduseSearchParams.
How Routing and Navigation Works
The App Router uses a hybrid approach for routing and navigation.
- On the server, your application code is automatically code-split by route segments.
- On the client, Next.js prefetches and caches the route segments. This means, when a user navigates to a new route, the browser doesn’t reload the page, and only the route segments that change re-render - improving the navigation experience and performance.
- Also support Partial Rendering, Soft Navigation, Back and Forward Navigation, Routing between
pages/andapp/
Streaming
What is Streaming
Streaming is a data transfer technique that allows you to break down a route into smaller “chunks” and progressively stream them from the server to the client as they become ready.
There are two ways you implement streaming in Next.js:
- At the page level, with the
loading.tsxfile. - For specific components, with
<Suspense>.
Streaming Features
- Streaming is an advanced method of Server Side Rendering.
- Streaming allows you to break down the page’s HTML into smaller chunks and progressively send those chunks from the server to the client.
- Streaming implement Partial Rendering.
- By streaming, you can prevent slow data requests from blocking your whole page. This allows the user to see and interact with parts of the page without waiting for all the data to load before any UI can be shown to the user.
- Streaming works well with React’s component model because each component can be considered a chunk.
Streaming a whole page with loading.tsx
loading.tsx is a special Next.js file built on top of Suspense, it allows you to create fallback UI to show as a replacement while page content loads. loading.tsx is describing the fallback UI which should be a static rendering.
To use Streaming with loading.tsx, the loading.tsx file is located at same folder level with page.tsx. Next.js will display loading.tsx first, then the page.tsx.
Also, The user doesn’t have to wait for the page to finish loading before navigating away. (this is called interruptable navigation).
When you use loading.tsx, usually you use Route Groups as well.
Route Groups Concept
When loading.tsx is a level higher than /subfolder/page.tsx in the file system, it’s also applied to that page. In order to fix this problem. Next.js use route groups concept: Create a new folder called /(overview) inside the dashboard folder. Then, move your loading.tsx and page.tsx files inside the folder. Now, the loading.tsx file will only apply to the same folder level page.
When you create a new folder using parentheses
(), the name won’t be included in the URL path.
Streaming a component with <Suspense>
Wrap the component which need to be Streaming into <Suspense>.
Suspense allows you to defer rendering parts of your application until some condition is met (e.g. data is loaded). You can wrap your dynamic components in Suspense. Then, pass it a fallback component to show while the dynamic component loads.
Steps:
- Move data fetching down to the component that need it, thus isolating which parts of your routes should be dynamic in preparation for Partial Prerendering.
- Using
<Suspense>to wrap that component.
<Suspense fallback={<FetchDataComponentSkeleton />}>
  <FetchDataComponent />
</Suspense>
Grouping Components Pattern
You can use Grouping components pattern when you want multiple components to load in at the same time. Step:
- Wrap all these multiple components into one component call WrapComponent.
- These Grouping components inside the WrapComponent can use
Promise.allto parallel fetch data. - Using
<Suspense>to wrap that WrapComponent.
What is Partial Prerendering
Application behaves today, where entire routes are either entirely static or dynamic.
Partial Prerendering allows you to render a route with a static loading shell, while keeping some parts dynamic. In other words, you can isolate the dynamic parts of a route.
When a user visits a route:
- A static route shell is served, ensuring a fast initial load.
- The shell leaves holes where dynamic content will load in asynchronous.
- The async holes are streamed in parallel, reducing the overall load time of the page.
Can Suspense used on Server?
Dynamic Routes
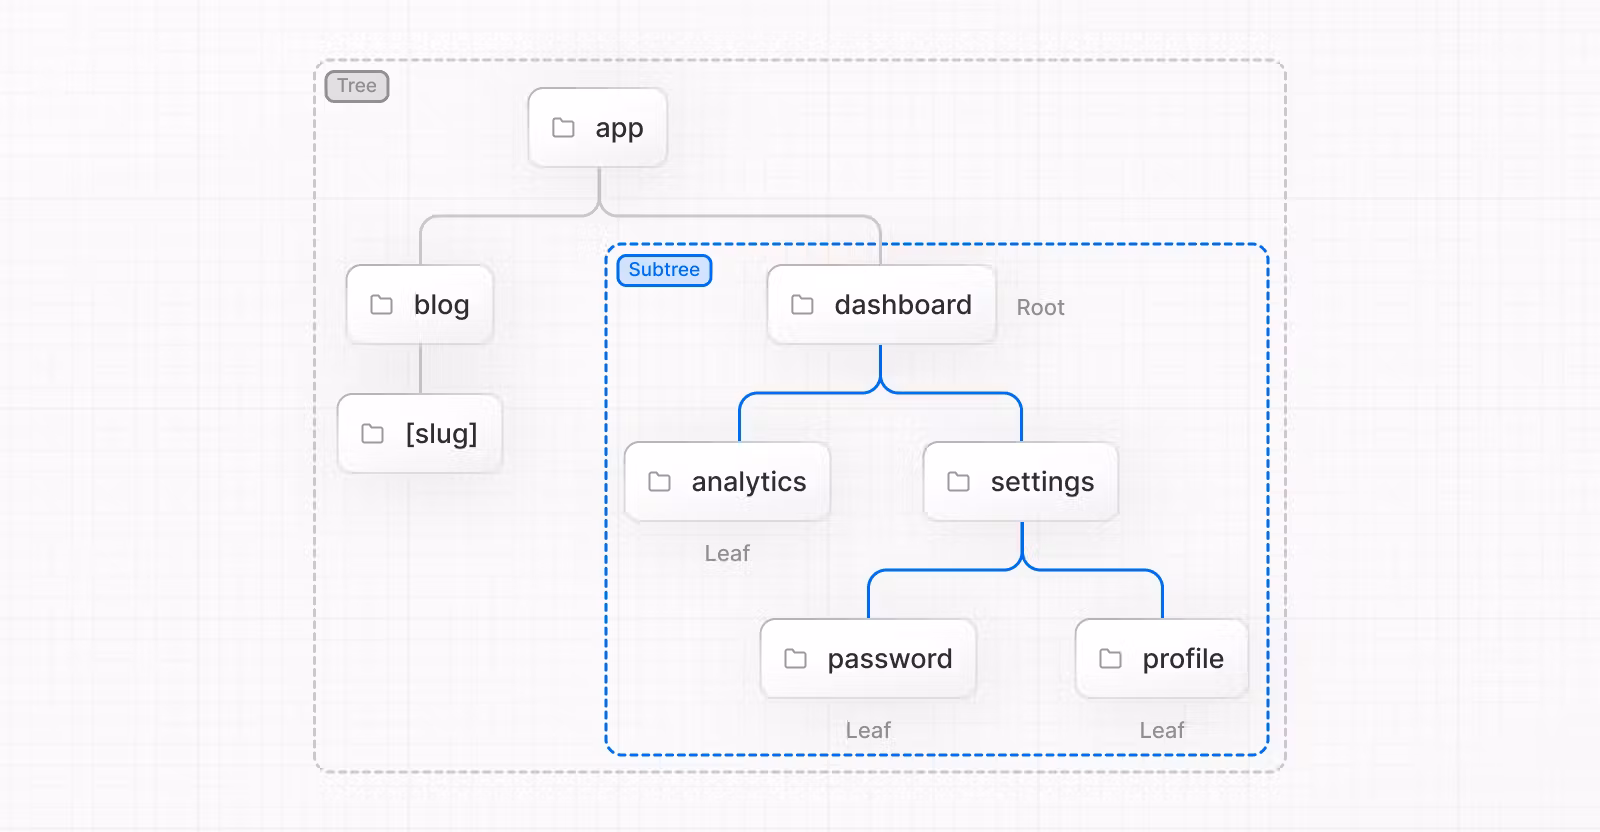
Next.js allows you to create Dynamic Route Segments when you don’t know the exact segment name and want to create routes based on data. This could be product ID, blog post titles, product pages, etc. You can create dynamic route segments by wrapping a folder’s name in square brackets. For example, [id], [post] or [slug].
For example, you need a invoice update function. Then you need to Create a Dynamic Route Segment with the invoice id.
Create Dynamic Route Steps:
-
In your /invoices folder, create a new dynamic route called [id], then a new route called
editwith apage.tsxfile. -
The Update Button for each invoice will do this.
<Link
  href={`/dashboard/invoices/${id}/edit`}
  className="rounded-md border p-2 hover:bg-gray-100"
>
- Inside the
[id]/edit/page.tsx, it will Read the invoiceidfrom pageparams.
export default async function Page({ params }: { params: { id: string } }) {
  const id = params.id;
  // ...
}
-
Inside the
[id]/edit/page.tsx, you will Fetch the specific invoice according to theidto fill the page. -
When user confirm update, You will update Database by using Server Action. At this moment, You can’t just pass
idto server action! Instead, you can pass id to the Server Action using JS bind.
const updateInvoiceWithId = updateInvoice.bind(null, invoice.id);
return (
  <form action={updateInvoiceWithId}>
    <input type="hidden" name="id" value={invoice.id} />
  </form>
);
generateStaticParams
- The
generateStaticParamsfunction is used in combination with dynamic route segments to statically generate routes at build time instead of on-demand at request time. - When exporting a function called
generateStaticParamsfrom a page that uses Dynamic Routes, Next.js will statically pre-render all the paths specified bygenerateStaticParams. -
generateStaticParamsreplaces thegetStaticPathsfunction in the Pages Router. - The primary benefit of the
generateStaticParamsfunction is its smart retrieval of data. If content is fetched within thegenerateStaticParamsfunction using a fetch request, the requests are automatically memoized. This means afetchrequest with the same arguments across multiplegenerateStaticParams, Layouts, and Pages will only be made once, which decreases build times.
Catch-all Segments
Dynamic Segments can be extended to catch-all subsequent segments by adding an ellipsis inside the brackets [...folderName].
For example, app/shop/[...slug]/page.js will match /shop/clothes, but also /shop/clothes/tops, /shop/clothes/tops/t-shirts, and so on.
Catch-all Segments can be made optional by including the parameter in double square brackets: [[...folderName]].
Parallel Routes
Parallel Routes allows you to simultaneously or conditionally render one or more pages within the same layout. They are useful for highly dynamic sections of an app, such as dashboards and feeds on social sites.
Slots
- Parallel routes are created using named slots.
- Slots are defined with the
@folderconvention. Likeapp/@slot/page.js. - Slots are passed as
propsto the shared parent layout. (layout usaully have current page aschildrenprop, that means thechildrenprop is an implicit slot that does not need to be mapped to a folder.app/page.jsis equivalent toapp/@children/page.js.) - Slots are not route segments and do not affect the URL structure.
Navigation
When you use Parallel route, you will face some situation, like navigation:
- Soft Navigation: During client-side navigation, Next.js will perform a partial render, changing the subpage within the slot, while maintaining the other slot’s active subpages, even if they don’t match the current URL.
- Hard Navigation: After a full-page load (browser refresh), Next.js cannot determine the active state for the slots that don’t match the current URL. Instead, it will render a default.js file for the unmatched slots, or 404 if
default.jsdoesn’t exist.
default.js
You can define a default.js file to render as a fallback for unmatched slots during the initial load or full-page reload.
Use Parallel route
- Conditional Routes: You can use Parallel Routes to conditionally render routes based on certain conditions, such as user role. For example, to render a different dashboard page for the
/adminor/userroles. - Use layout inside slot.
- Modals Parallel Routes can be used together with “Intercepting Routes” to create modals. This allows you to solve common challenges when building modals, such as:
- Making the modal content shareable through a URL.
- Preserving context when the page is refreshed, instead of closing the modal.
- Closing the modal on backwards navigation rather than going to the previous route.
- Reopening the modal on forwards navigation.
Intercepting Routes
Intercepting routes allows you to load a route from another part of your application within the current layout. This routing paradigm can be useful when you want to display the content of a route without the user switching to a different context.
For example, when clicking on a photo in a feed, you can display the photo in a modal, overlaying the feed. In this case, Next.js intercepts the /photo/123 route, masks the URL, and overlays it over /feed.
Convention
Intercepting routes can be defined with the (..) convention, which is similar to relative path convention ../ but for segments.
You can use:
-
(.)to match segments on the same level -
(..)to match segments one level above -
(..)(..)to match segments two levels above -
(...)to match segments from the root app directory
For example, you can intercept the photo segment from within the feed segment by creating a (..)photo directory.
Modals
Intercepting Routes can be used together with Parallel Routes to create modals.
Route Handler
What is Route Handler
Route Handlers allow you to create custom request handlers for a given route using the Web Request and Response APIs. Route Handlers need to be defined in a route.ts file inside the app directory.
Basic Example:
// app/api/route.ts
export async function GET() {
  const res = await fetch('https://data.mongodb-api.com/...', {
    headers: {
      'Content-Type': 'application/json',
      'API-Key': process.env.DATA_API_KEY,
    },
  })
  const data = await res.json()
  return Response.json({ data })
}
Now, any Get Request at route api/ will be handled by the export function GET().
Route Handler Features
- Route Handlers can be nested inside the app directory, similar to page.js and layout.js.
- Each route.js or page.js file takes over all HTTP verbs for that route. So they can’t be at same route segment.
- Route Handlers are cached by default when using the
GETmethod with the Response object. - In the old version, Next.js Page Route, it use “API Routes” to do the same job: providing a solution to build a public API.
What you can do with Route Handler
- You setup Revalidate Cached Data for a Route API.
- Route Handlers can be used with dynamic functions from Next.js, like cookies and headers.
- Redirects
- Support Dynamic Route Segments
- The request object passed to the Route Handler is a NextRequest instance, which has some additional convenience methods.
- Use Streaming with Large Language Models (LLMs), such as OpenAI, for AI-generated content.
- You can use Request Body FormData.
When to use Route Handler??
Internationalization
Next.js enables you to configure the routing and rendering of content to support multiple languages. Making your site adaptive to different locales includes translated content (localization) and internationalized routes.
How
Using some 3th libraries, you can look at an incoming Request to determine which locale to select. With this information, redirect the user based on the locale inside Middleware.
Even the root layout can also be nested in the new folder (e.g. app/[lang]/layout.js).
You can use generateStaticParams with any page or layout to generate static routes for a given set of locales.
FAQ
How to refresh a server component?
- In the Client component, use
const router = useRouter();androuter.refresh();