OAuth is a standard. There are many company implement OAuth according to this Standard. The implementation should be very similar.
First of all, you need to create OAuth App in Authorization Server.
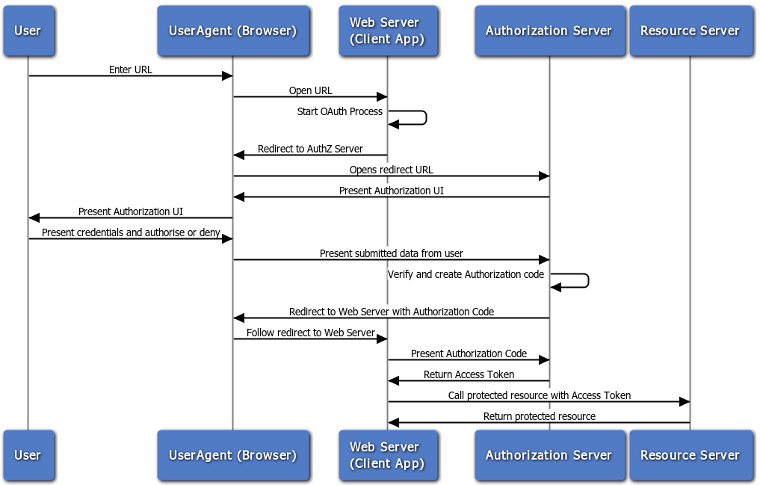
In OAuth Flow, usually there are some Roles:
- User
- Browser
- Website App
-
The Authorization Server
- resource owner (User)
- resource server
- client (Website App)
- authorization server
There are different OAuth Flow for defferent app types:
- Single-page app (SPA)
- Web app
- Web API
- Mobile and native apps
- Service, daemon, script
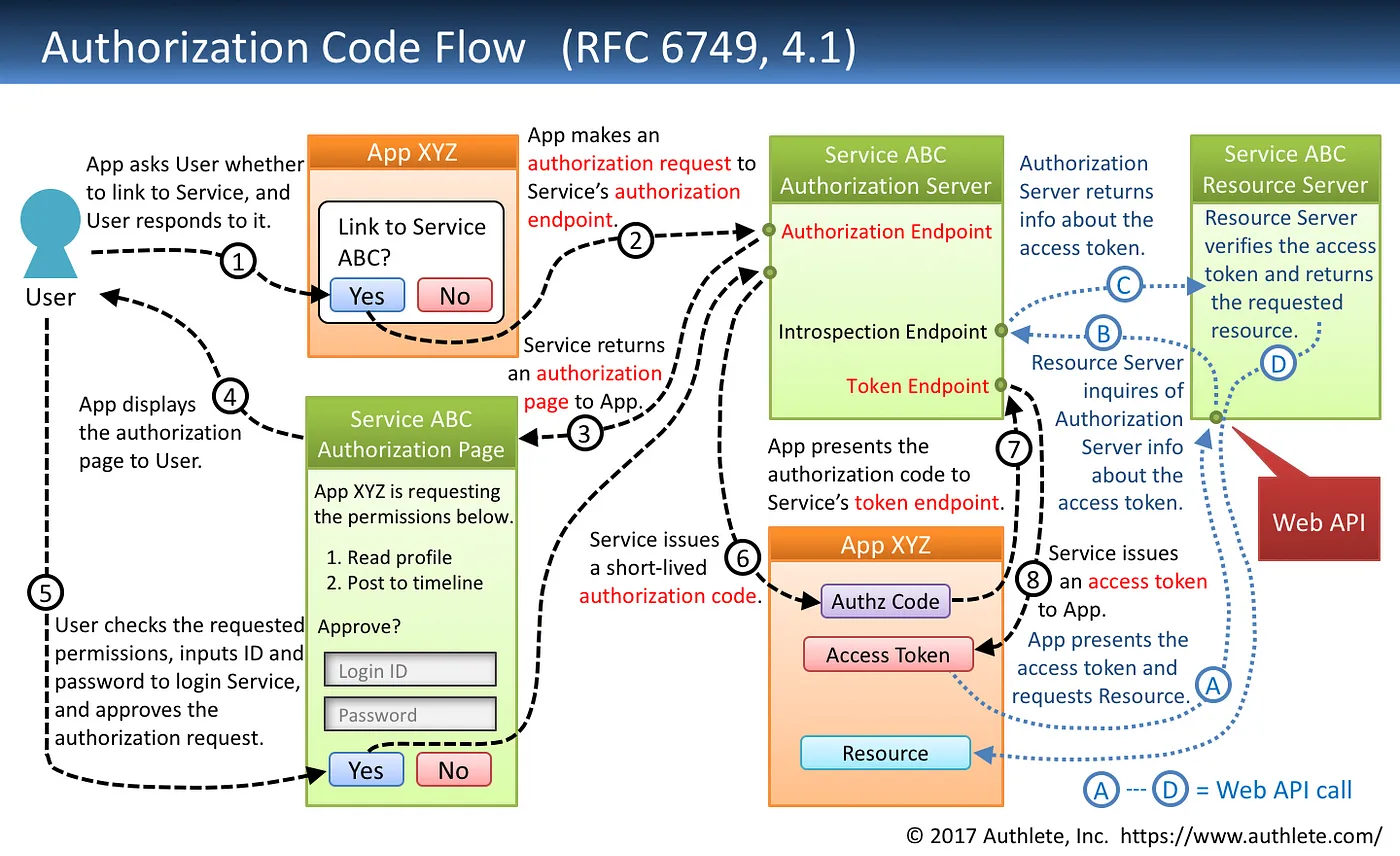
Web app flow
(github implementation)
The web application flow to authorize users for your app is:
- Users are redirected to request their GitHub identity
- Users are redirected back to your site by GitHub
- Your app accesses the API with the user’s access token
1. Request a user’s GitHub identity
GET https://github.com/login/oauth/authorize
This endpoint takes the following input parameters.
-
client_idstring Required -
redirect_uristring Strongly recommended -
loginstring Optional -
scopestring Context dependent -
statestring Strongly recommended
2. Users are redirected back to your site by GitHub
If the user accepts your request, GitHub redirects back to your site with a temporary code(authorization code) in a code parameter as well as the state you provided in the previous step in a state parameter.
Exchange this code for an access token:
POST https://github.com/login/oauth/access_toke
This endpoint takes the following input parameters.
-
client_idstring Required -
client_secretstring Required -
codestring Required -
redirect_uristring Strongly recommended
By default, the response takes the following form:
access_token=gho_16C7e42F292c6912E7710c838347Ae178B4a&scope=repo%2Cgist&token_type=bearer
3. Use the access token to access the API
The access token allows you to make requests to the API on a behalf of a user.
Authorization: Bearer OAUTH-TOKEN
GET https://api.github.com/user
For example, in curl you can set the Authorization header like this:
curl -H "Authorization: Bearer OAUTH-TOKEN" https://api.github.com/user
Every time you receive an access token, you should use the token to revalidate the user’s identity. A user can change which account they are signed into when you send them to authorize your app,
Another one:
About Redirect_URI
Redirect_RUI need be defined in the Authorization Server. And When User is using GET and POST to access Authorization Server, it can use the redirect_uri parameter.
- If left out, GitHub will redirect users to the callback URL configured in the OAuth app settings.
- If provided, the redirect URL’s host (excluding sub-domains) and port must exactly match the callback URL. The redirect URL’s path must reference a subdirectory of the callback URL.(I spent whole day to figure out this mismatch error)
Loopback redirect urls
The optional redirect_uri parameter can also be used for loopback URLs, which is useful for native applications running on a desktop computer. If the application specifies a loopback URL and a port, then after authorizing the application users will be redirected to the provided URL and port. The redirect_uri does not need to match the port specified in the callback URL for the app.
You can use http://127.0.0.1:1234/path as redirect_uri.
Note that OAuth RFC recommends not to use
localhost, but instead to use loopback literal127.0.0.1orIPv6 ::1.
Single-page app flow
Many modern apps have a single-page app (SPA) front end written primarily in JavaScript, often with a framework like Angular, React, or Vue.
Single-page apps (or browser-based apps) run entirely in the browser after loading the source code from a web page. Since the entire source code is available to the browser, they cannot maintain the confidentiality of a client secret, so the secret is not used in this case.
Previously, it was recommended that browser-based apps use the “Implicit” flow, which returns an access token immediately in the redirect and does not have a token exchange step. In the time since the spec was originally written, the industry best practice has changed to recommend that the authorization code flow be used without the client secret. This provides more opportunities to create a secure flow, such as using the Proof Key for Code Exchange (PKCE) extension.
PKCE
PKCE-enhanced Authorization Code Flow builds upon the standard Authorization Code Flow, the steps are very similar with Web app flow. But with the addition of a dynamically generated secret used on each request. This is known as the PKCE extension.
The main difference between Implicit and PKCE flow is ADDing authorization code.
Definition of Proof Key for Code Exchange (PKCE) OAuth 2.0 RFC 7636.
                                                 +-------------------+
                                                 |   Authz Server    |
       +--------+                                | +---------------+ |
       |        |--(A)- Authorization Request ---->|               | |
       |        |       + t(code_verifier), t_m  | | Authorization | |
       |        |                                | |    Endpoint   | |
       |        |<-(B)---- Authorization Code -----|               | |
       |        |                                | +---------------+ |
       | Client |                                |                   |
       |        |                                | +---------------+ |
       |        |--(C)-- Access Token Request ---->|               | |
       |        |          + code_verifier       | |    Token      | |
       |        |                                | |   Endpoint    | |
       |        |<-(D)------ Access Token ---------|               | |
       +--------+                                | +---------------+ |
                                                 +-------------------+